
How to Make a Bow with Wired Ribbon: Easy Step-by-Step Guide
Table of Contents
Wired ribbon is one of the easiest ribbons to use for making full, structured bows because the wired edges help loops hold their shape. If you have ever watched a bow collapse into a flat pile of fabric seconds after you tied it, you already know the difference a wire edge makes.
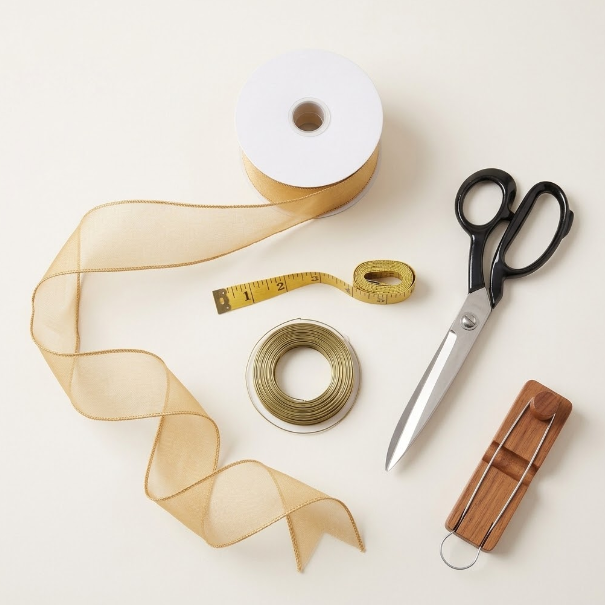
The thin wire running along both edges of wired ribbon holds each loop exactly where you place it, allowing you to adjust, reshape, and perfect the bow without anything drooping or going flat. This guide walks you through the full process — from choosing the right ribbon width to fluffing the finished bow — so you can create a polished, professional result whether it is for a wreath, a gift, or a holiday display.
Why Use Wired Ribbon for Making Bows?
The core advantage of wired ribbon comes down to one thing: control. Regular ribbon is beautiful for draping and flowing, but when you want a bow that stands up tall with distinct, defined loops, unwired ribbon tends to flatten and sag. Wired ribbon lets you literally sculpt the bow into shape.
Here is what that means in practice:
- Holds its shape — each loop stays where you position it, even after you let go
- Easier to form large loops — the wire edge provides structure that supports bigger, more dramatic loops
- Easy to reshape — if a loop looks off, you can bend and adjust it without untying anything
- Creates fuller bows — more loops maintain their volume instead of collapsing inward
- Ideal for wreaths, Christmas trees, gift wrapping, and home décor — anywhere you need a bow that looks good from every angle
If you are new to bow making, wired ribbon is actually more forgiving than regular ribbon because you can fix mistakes by reshaping rather than starting over.
Ready to start? Browse our Wired Ribbon Collection to find the perfect width and color for your project.
What You Need to Make a Wired Ribbon Bow
You do not need a special bow-making tool. Many beginners wonder whether a bow maker is necessary — it holds the loops for you while you work, which is convenient, but two hands and a bit of practice get the job done just as well.
| Material | Recommended |
|---|---|
| Wired ribbon | 2–3 inch for medium/large bows |
| Scissors | Sharp scissors (dull blades crush the wire edge) |
| Floral wire / pipe cleaner | 10–12 inch length for securing the center |
| Ruler or measuring tape | Optional but helpful for even loops |
| Wire cutters | Optional, for trimming excess fastener |
| Bow maker | Optional |
For the fastener, 22-gauge floral wire is the industry standard for standard bows, while zip ties work well for heavy outdoor wreaths that need extra security. Pipe cleaners are a good beginner option because they are soft on your hands and grip the ribbon fabric well.
How to Make a Bow with Wired Ribbon
This loop-and-pinch method works for beginners and produces a full, multi-loop bow suitable for wreaths, gifts, tree toppers, and more. The key is keeping one hand pinching the center throughout the entire process — if you release the center pinch too early, the entire structure collapses and you have to start over.
Step 1 — Choose Your Ribbon
Ribbon width determines the character of your bow. Here is a quick guide:
- 1–1.5 inch — small bows for gifts, hair accessories, and delicate packages
- 2–2.5 inch — medium to large bows; 2.5-inch is the standard for wreaths and Christmas tree bows
- 3–4 inch — oversized decorative bows for large outdoor wreaths or statement pieces
For most wreath projects, 2.5-inch wired ribbon works best because it is wide enough to make a nice, full bow, and the wire allows you to easily adjust it to keep it in place.
For this tutorial, I’m using the 2.5-inch Organza Wired Ribbon from SeekRibbon. It’s a great width for wreaths and large decorative bows.
Step 2 — Measure and Cut the Ribbon
For a medium-to-large decorative bow, start with approximately 6–10 feet of 2.5-inch wired ribbon. Plan for 6–9 feet per standard bow with tails, and larger decorative bows may require 10 feet or more.
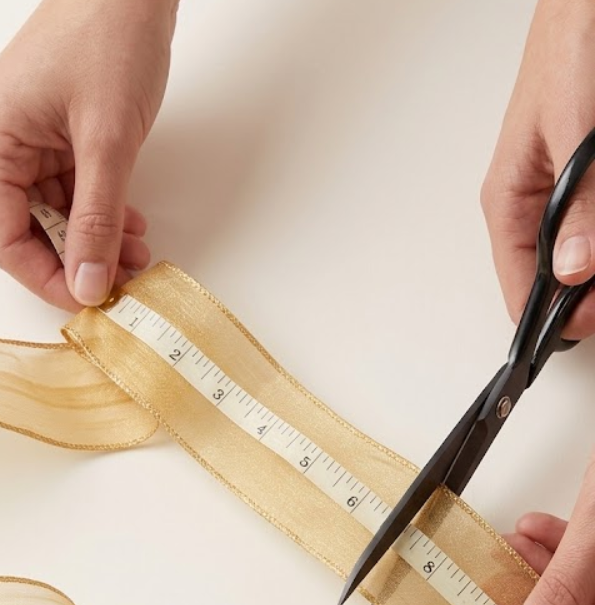
A practical breakdown for a wreath bow: 2.5-inch wired ribbon (minimum 9 feet total) — 6 feet for the bow loops and 3 feet for the tails at 18 inches each.
It is always better to start with extra ribbon and trim the tails later. Running short mid-construction is much harder to recover from than cutting away excess.
Step 3 — Make the Center Loop
Hold the end of the ribbon, leaving a 6–8 inch tail, and form a small loop approximately 2–3 inches in diameter. Pinch it at the center between your thumb and forefinger. This small center loop becomes the anchor point for all the loops that follow.

Step 4 — Create the First Side Loop
Make a larger loop on one side, bringing the ribbon back to the center. Twist the ribbon at the center so the finished side faces outward. This twist is critical: most ribbon has a right side and a wrong side, and without a half-twist at the center, every second loop will show you the back of the ribbon.
The twist feels fussy for the first two loops and then becomes automatic.
Step 5 — Build the Remaining Loops
Continue alternating loops on each side of the center. For a standard wreath bow, aim for 3 loops on each side. Gradually make each loop slightly larger than the previous one to create a layered, dimensional effect.
For a fuller bow, add additional loops — an 8-loop bow will be noticeably more voluminous than a 6-loop version. More loops and wider ribbon produce fuller bows, so adjust both to fit your project size.
Step 6 — Secure the Center
Once you have your desired number of loops, secure the bow in the center using floral wire, a pipe cleaner, or a zip tie. Pull the wire tight around the center and twist to hold. For outdoor wreaths, a zip tie provides the most security and prevents the center from slipping.
Step 7 — Add and Shape the Tails
Cut two pieces of ribbon, each 18 inches long, for the tails. Place them flat on a table, overlapping at the top so they spread out at an angle at the bottom, then feed the top through the center loop and secure with the floral wire.
For finishing the tail ends, you have three options:
- Straight cut — simple and clean
- Diagonal cut — angled for a softer look
- Dovetail cut (V-shape) — the most polished finish, and it helps prevent fraying
Cut the tails at an angle or into a V-shape so they do not fray straight across.
Step 8 — Fluff and Shape the Bow
Do not judge the bow immediately after securing it. This step is where wired ribbon truly outperforms everything else.
Working loop by loop, gently pull each one outward, twist it so it faces a slightly different direction than its neighbor, and bend the wire edge to adjust the loop angle and size. Push the whole bow wider than looks right — bows compress when you attach them, so a bow that looks slightly overdone on the table looks correct on a door.
For wired ribbon, bend and curve the loops for extra dimension. This is the step that transforms a flat bundle into a dimensional, professional bow.
How Much Wired Ribbon Do You Need?
This is one of the most common questions, and the honest answer is that it depends on loop count, loop size, and tail length. That said, here are practical starting estimates:
| Bow Size | Ribbon Width | Approx. Ribbon |
|---|---|---|
| Small | 1–1.5″ | 3–5 ft |
| Medium | 2–2.5″ | 5–8 ft |
| Large | 2.5–3″ | 8–12 ft |
| Oversized | 3–4″ | 10+ ft |
These are starting estimates rather than fixed measurements. For a truly giant bow or tree topper, you may need 5–7 yards of wired ribbon. Always buy more than you think you need — you can trim excess, but you cannot add ribbon back.
What Size Wired Ribbon Is Best for a Bow?
Choosing the right width depends on where the bow will live:
- 1–1.5 inch — small bows for gifts, packages, and hair accessories
- 2 inch — medium bows for gift wrapping and smaller wreaths
- 2.5 inch — large bows for wreaths, Christmas trees, and front-door décor; this is the most versatile width
- 3–4 inch — oversized decorative bows for large outdoor wreaths and dramatic statement pieces
For wreaths specifically, a good rule is to size the bow to the wreath, not the door. A bow about one-third of the wreath’s outside diameter looks balanced. A 22-inch wreath wants a bow around 7 to 8 inches across, while a 30-inch front-door wreath needs a layered bow or 3-inch ribbon to avoid looking undersized.
What Can You Use a Wired Ribbon Bow For?
A well-made wired ribbon bow works across a wide range of applications:
- 🎁 Gift Wrapping — wired ribbon is forgiving and can be fluffed once the package reaches its destination, making it ideal for shipping gifts
- 🎄 Christmas Tree — wired ribbon holds its shape beautifully on tree branches and makes an excellent tree topper
- 🌿 Wreaths — the structured loops maintain their form even outdoors
- 💐 Flower Arrangements — wired ribbon allows you to sculpt the bow to complement the arrangement
- 🏠 Home Décor — chair backs, mantel displays, and table centerpieces
- 🎀 Chair Décor — wedding and event seating
- 🎉 Party Decorations — balloon garlands and backdrop accents
How to Make a Christmas Bow with Wired Ribbon
While wired ribbon bows work year-round, Christmas is when they truly shine. A wired ribbon Christmas bow follows the exact same steps outlined above, with one adjustment: for a classic tree bow, hold the ribbon firmly in the center, create a loop, twist, then create another loop on the opposite side, twisting again. For a giant tree topper, start with at least 5–7 yards of ribbon and use 4-inch wide wired ribbon for maximum presence.
Common Wired Ribbon Bow Mistakes
Even with wired ribbon’s forgiving nature, a few mistakes can make the difference between a flat, sad bow and a full, professional one.
1. Making the loops too small. Small loops create a tight, cramped bow. Loops should be generous — 4–5 inches for a standard wreath bow, larger for decorative pieces.
2. Not twisting the ribbon. Without a half-twist at the center between every loop, every second loop shows the back of the ribbon. This is the single most common reason bows look “off”.
3. Using too little ribbon. Running short halfway through is the most common way a bow ends up with stubby tails. Always start with more than you need.
4. Making uneven loops. Uneven loops and tails are one of the most common bow-making struggles. If one side is longer than the other, the bow can look off-balance. Use a gridded cutting mat or ruler to measure.
5. Not fluffing the bow. Skipping the fluffing step leaves you with a flat bundle instead of a dimensional, professional-looking bow. This step is not optional.
6. Cutting the tails too early. Cut tails long — 12 inches minimum per tail. You can always shorten a tail once the bow is attached and you can see how it hangs. You cannot add ribbon back.
7. Releasing the center pinch too early. Letting go while forming new loops causes the entire structure to collapse, requiring you to start over.
FAQ
Can you make a bow with wired ribbon?
Yes — wired ribbon is actually the best ribbon type for bow making. The wire edges hold each loop’s shape independently, making it ideal for beginners and experienced crafters alike.
How much wired ribbon do I need to make a bow?
Plan for 6–9 feet per standard bow with tails. Larger decorative bows may require 10 feet or more. A medium-to-large wreath bow typically needs about 9 feet: 6 feet for loops and 3 feet for tails.
What size wired ribbon is best for bows?
2.5-inch wired ribbon is the most versatile width and the standard for wreaths and Christmas tree bows. For smaller gifts and accessories, 1–1.5 inch works well. For oversized decorative statements, use 3–4 inch.
Is wired ribbon easier to use for bows?
Yes. Wired ribbon is more forgiving than regular ribbon because you can reshape loops after tying. Regular ribbon tends to droop or flatten more easily, making it harder to achieve a well-defined, voluminous bow.
Can I make a large bow with wired ribbon?
Absolutely. Wired ribbon is actually the best choice for large bows because the wire edge supports bigger loops without collapsing. For a large bow, use 2.5–3 inch ribbon and start with at least 8–12 feet.
What can I use instead of floral wire?
Pipe cleaners, zip ties, and chenille stems all work well. Pipe cleaners are soft on your hands and grip the ribbon fabric effectively. Zip ties provide the strongest hold for outdoor wreaths.
How do I keep my wired ribbon bow from flattening?
The wire edge is your ally here. After securing the bow, fluff each loop by pulling it outward, twisting it to face a different direction, and bending the wire edge to hold the shape. Wired ribbon bows can be reshaped anytime, so if the bow flattens after storage or shipping, simply re-fluff it.
Can wired ribbon be reused?
Yes — wired ribbon is more durable than unwired ribbon and holds up well from year to year. The wire edge can be reshaped repeatedly without losing its ability to hold a curve.
Final Thoughts
Making a bow with wired ribbon is a skill that pays off every time you wrap a gift, decorate a wreath, or trim a tree. The wire edges do most of the hard work for you — they hold the loops, support the shape, and let you adjust until the bow looks exactly right.
The most important takeaways: twist between every loop so the good side faces out, keep one hand pinching the center throughout, always cut more ribbon than you think you need, and never skip the fluffing step.
Ready to make your own?
Shop our Wired Ribbon Collection for wreath-ready 2.5-inch ribbons, dramatic 4-inch statement ribbons, and every width in between.