How to Make a Ribbon Rose: A Step-by-Step DIY Guide
Have you ever wondered how to make a stunning ribbon rose that looks almost real? Whether you’re embellishing a gift, decorating your home, or creating handmade accessories, ribbon roses add an elegant touch. Before we dive into the details, watch this quick video tutorial to see the entire process in action from start to finish:
In the following step-by-step guide, I’ll break down each part of the process. As a DIY enthusiast, I used a delicate organza ribbon to create this project—but you can adapt these steps for satin, grosgrain, or any ribbon you have.
Why Make Ribbon Roses?
Ribbon roses are versatile, durable, and perfect for craft projects. They never wilt and can be customized in any color or size. Plus, learning how to make a rose out of a ribbon is a satisfying skill that opens up endless creative possibilities.
Materials You Will Need
Gathering the right materials is the first step to success. Here’s what you’ll need:
- Ribbon: I recommend using a 5cm (2 inch) wide organza or satin ribbon from RibbonBuy. About 30-40cm (12-16 inches) per rose is ideal.
- A Ruler or a Straight, Flat Object: This is the key to our method! Any rigid, straight-edged item will work as a mold.
- Scissors
- Double-Sided Tape
- A Small Stick, Skewer, or Floral Wire: This will become the stem of your rose.
- Glue (Optional): A hot glue gun or strong craft glue can help secure the end.
Step-by-Step Instructions: How to Make a Rose from a Ribbon
Step 1: Secure the Ribbon End
Start by holding one end of the ribbon firmly against the end of your ruler with your finger. This secured end will become the center of your rose bud.
Step 2: Create the Diagonal First Fold
Now, take the ribbon and fold it diagonally across the width of the ruler to form a triangle. Press this fold against the ruler. This triangle forms the first inner petal of your rose.
Step 3: Repeat and Wrap
Continue the process! Fold the ribbon back on the opposite diagonal, creating another triangle, and wrap it around the ruler. Repeat this diagonal folding and wrapping motion, ensuring each fold aligns neatly next to the previous one. The ribbon will start to form a staggered, layered pattern along the ruler. Continue until you have enough length for your desired rose size.
Step 4: Trim and Apply Tape
Once you’re satisfied with the length of wrapped ribbon, use your scissors to trim off the excess. Next, carefully apply a strip of double-sided tape along the entire length of the ribbon wrapped around the ruler.
Step 5: Attach the Stem and Roll
This is where the magic happens. Place the end of your stick or wire onto the double-sided tape at one end of the wrapped ribbon. Now, slowly and firmly roll the ruler, allowing the ribbon with its pre-formed triangular folds to peel off and wrap around the stem. Keep the roll tight at the base (near the stem) for a compact rose.
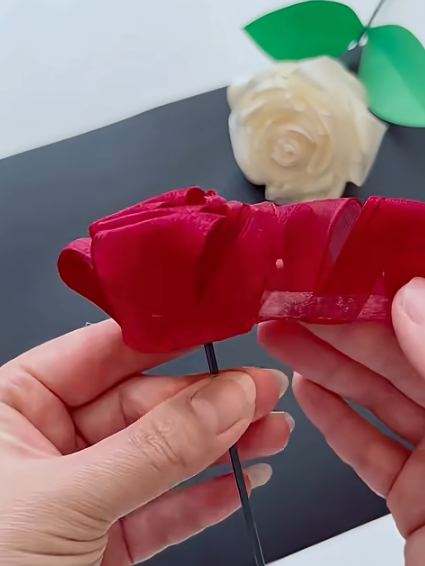
Step 6: Secure and Fluff
Once fully rolled, press the end of the ribbon onto the tape to secure it. Gently adjust and fluff the “petals” (the folded triangles) outward to give your rose a full, natural bloom. For extra security, you can add a drop of glue at the base where the ribbon ends.
Pro Tips for Success
Batch Production: This method is perfect for making multiple identical roses quickly. Prepare several lengths of ribbon on the ruler before you start rolling.
Consistency is Key: Try to keep the angle and size of each diagonal fold as consistent as possible for uniform petals.
Experiment with Tension: Rolling tighter creates a budding rose, while rolling looser results in a more open, full bloom.
Choose the Right Ribbon: Wired ribbon holds its shape spectacularly with this method. Try RibbonBuy’s wired satin ribbon for dramatic, long-lasting roses.
Common Questions Answered
How do you make a rose out of ribbon if you’re a beginner?
Start with a wider ribbon (2 inches) as it’s easier to handle. Follow the twist-and-wrap method slowly—don’t rush the shaping.
How to make a rose flower with ribbon that looks realistic?
Layer different shades of the same color ribbon, or slightly tint the edges with fabric paint for depth. Natural roses aren’t perfect, so vary petal sizes.
Can I use this method for other ribbon flowers?
Absolutely! This technique adapts well for peonies or carnations by adjusting the tightness of your folds.
Conclusion
Learning how to make a rose from a ribbon is a fun, rewarding craft. With a little practice, you’ll be creating gorgeous ribbon roses to adorn gifts, hair clips, wreaths, and more. I used RibbonBuy’s organza ribbon for its sheen and durability—it holds shape beautifully. Remember, the beauty of handmade items lies in their uniqueness, so embrace your own style.
Give it a try! Share your creations online with #RibbonRoseDIY. Happy crafting!